How To Embroider On Knitting
There is something so whimsical and magical about embroidery on knit sweaters, mittens, and hats. Not only is it a really fun fall craft to do, but it’s an awesome way to add your own personal flair to clothes and accessories.
There are some additional considerations and techniques to use for knit fabrics as compared to other kinds of fabrics and clothing This tutorial will walk you through how to embroider on knitting so that you don’t mess up the stitches. I’ll share everything you need to know so the end result will be something you’ll be proud to wear.
Disclaimer: This post contains affiliate links, which means I may earn a small commission if you choose to purchase an item.

-
 Product on saleLeaping Woodland Fox Sweater Embroidery PatternOriginal price was: 9,00 €.8,00 €Current price is: 8,00 €.
 -
Product on saleLeaping Rabbit Shirt Pocket Embroidery PatternOriginal price was: 5,00 €.4,00 €Current price is: 4,00 €.
-
Product on saleTeapot Hedgehog Clothing Embroidery PatternOriginal price was: 9,00 €.8,00 €Current price is: 8,00 €.


Choosing The Best Knits

Some knit patterns and designs are harder to embroider on than others. It’s easiest to choose knitting where the stitches are small, close together, and relatively tight and even.
There is naturally going to be a bit of stretch with knits, so choosing one with the least stretch possible is ideal.
The looser the knit stitches are, the less structured it will be. This means it may stretch more, which will make it harder to embroider on without warping the structure of the knitting.
It’s best to avoid anything with large holes in it. Techniques such as knit lace are beautiful but they’ll be way harder to stitch on, especially if you’re planning a larger, more complicated design that covers a lot of the fabric.
If you’ve never embroidered on knitted items before, I recommend choosing something that doesn’t have cabling, knit lace, or any of the more textured knit stitches. Stockinette stitching, which is the most basic knit stitch, is the easiest to start out with.
Best Fibers And Materials To Embroider On
Knit fabrics that are made from natural fibers, such as wool or cotton, are durable and have less stretch to them. If possible, choose a knit that’s made out of those materials and try to avoid acrylics.
Working With Cabling And More Textured Knitting
It’s totally doable to stitch on top of knitting that has cabling or ribbing, but you’ll want to pay close attention to how you are stretching the fabric as you’re stitching.
Additionally, take extra care when embroidering on areas of knitting where stretching will occur (rib stitching on hats, cuffs of sweaters etc.) It’s possible to embroider on these areas, but you’ll want to make sure you aren’t completely disrupting the stretch. You may want to stick to smaller sized embroidery designs in these areas.

Kinds of Embroidery Thread and Flosses To Use
You can use virtually any type of floss or thread that is used for embroidery, such as stranded cotton floss, non-divisible pearl cotton thread, and different kinds of yarn. I generally like to stick to fibers that are made of either wool or cotton.
If you want a chunky, fluffy fiber to work with, tapestry yarn and crewel wool look great, especially on knitting.
Metallic threads are a bit trickier to work with. They can be slick and harder to knot and secure, so you’ll want to be extra careful with those.
If you’re embroidering on an article of clothing, you’ll want to check that the thread you choose is colorfast. Most larger brands of embroidery thread like DMC and Anchor are, but if you are working with a naturally dyed yarn or floss, you’ll want to test it before committing to using it. Depending on the process and kind of dye that’s used as well as the presence or absence of mordants, certain naturally dyed fibers may not be as tolerant with washing.

Hand Embroidery On Sweaters
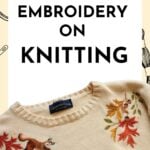
Sweaters are a great article of clothing to embroider on because they’re large enough to place in a hoop and you can make really beautiful designs along the collar and torso with ease. I chose a cream stockinette stitch sweater for the example in this tutorial. It’s made of cotton yarn, the stitches are somewhat close together, and it has minimal stretch, so it was perfect for an embroidery project!
Supplies Used
- 6 inch embroidery hoop
- embroidery scissors
- embroidery needle
- DMC embroidery floss
- Pellon Stick and Tear Away Stabilizer
- Sulky Stick N Stitch Stabilizer
Prepping The Knit Fabric

Transferring Embroidery Patterns To Knitting
One way to transfer the pattern is by using a water soluble marker, which can be used to directly draw onto the fabric. However, you most likely won’t be able to easily trace through the fabric, so you won’t be able to directly reference a design this way. But hey, if you’re good winging it, this method will do!
The easiest way I have found to transfer a design is by using water soluble stick n stitch stabilizer. This kind of stabilizer comes in sheets that fit in your printer, so you can print directly onto the stabilizer. It’s super easy to use.
One important tip is to lower the opacity when printing off the design. This will use a bit less ink, which will lessen the chances of the ink bleeding onto your article of clothing when you wash the stabilizer away.
Once you’ve printed out the design, simply cut it out and place the design where you want to stitch it.

Using Stabilizers
The stick n stitch should provide a small amount of stabilization so that the fabric doesn’t move or stretch too much, but you’ll also want to use a stabilizer on the back. It seems like a lot but it makes such a difference. I prefer to use Pellon stick and tear away stabilizer. It’s easy to stitch through by hand and it comes off pretty well in water once you’re finished.
I like to place the stabilizer on the back after I have chosen where I’m going to stitch. I do this before I put the fabric in an embroidery hoop to ensure that the knitting doesn’t get stretched or obscured at all.
Using An Embroidery Hoop
It’s very helpful to use an embroidery hoop while you’re stitching, especially for larger designs. This will stabilize the fabric while you’re embroidering on it, preventing puckering or wrinkles from occurring. It will also be easier to hold in your hands.
Once you’ve sandwiched the fabric with stick n stitch on the front and stick and peel away on the back, you can place the fabric in an embroidery hoop. Pull the fabric tight, but avoid over stretching it. If this happens, you’ll start to see the rows of knitting warp and stretch.
Screw the hoop as tightly as you can once you’re happy with the placement.
If you’re worried the embroidery hoop will crease or snag the knit stitches, you can bind it with fabric to pad it before you get started.

Embroidery Stitches To Use
You can essentially use any embroidery stitch you want! I used a combination of long and short stitches, satin stitches, and French knots for my design.
Check out even more embroidery stitches to use here.
Here are a few considerations to keep in mind:
- Keep your stitches relatively short. If you carry the thread over too large of an area, fill stitches such as the satin stitch can sag once you wash the sweater and take it out of the hoop. If you have a large area to fill in, try using the long and short stitch instead.
- Try to keep good tension on your stitches so they aren’t loose, but avoid pulling them so tight that the fabric visibly puckers.
Starting and Securing Stitches
It’s super important that you secure each strand of thread when you’re embroidering on clothes. Washing and wearing clothes is a lot harder on embroidery than displaying it in a frame or hoop, so you’ll want to do everything you can to ensure the stitches don’t unravel.
Depending on the size of the knitting, you may not be able to start a strand of thread with a knot. (It may just pull completely through the fabric.) Instead, leave a tail and secure both ends once you’re finished with the thread.
As a rule of thumb, I like to double knot all of the ends of thread.
Take a look at this post for some methods to use for starting and ending embroidery stitches.
Finishing The Project
When you’re finished embroidering, both stabilizers wash away with warm water. In order to completely remove the stick n stitch, I recommend submerging the embroidery in warm water, letting it soak for a few minutes while gently rubbing the stabilizer. It should slowly crumble and wash away. Then you can rinse it under running water if there is leftover stabilizer that aren’t coming out.
Gently press the water out of the sweater. Avoid wringing it out as this could stretch out the knitting and disturb the embroidery.
Allow the sweater to hang dry.

Caring For Embroidery On Knitting
You’ll want to be really careful when you wash knitting that has embroidery on it. The safest way to care for it is to wash it by hand with mild soap and hang it to dry. To read even more about embroidered clothing care, check out this guide. And if you used naturally dyed fibers, also check out this article.
I hope you found this article helpful and you embroider something magical! Check out this tutorial to learn how to embroider flowers on a sweater or this one for embroidering names and shapes on sweaters.