How To Do The Raised Stem Stitch
The raised stem stitch is a variation of the stem stitch and it has a woven or braided appearance to it. It can be used as a decorative border or it can be worked in rows to fill in an area. This particular stitch is one that is used commonly in stumpwork embroidery.

Raised Stem Stitch
Draw a rectangular shape onto the fabric before you start stitching. It’s helpful to have an embroidery needle and a tapestry needle to work this stitch.
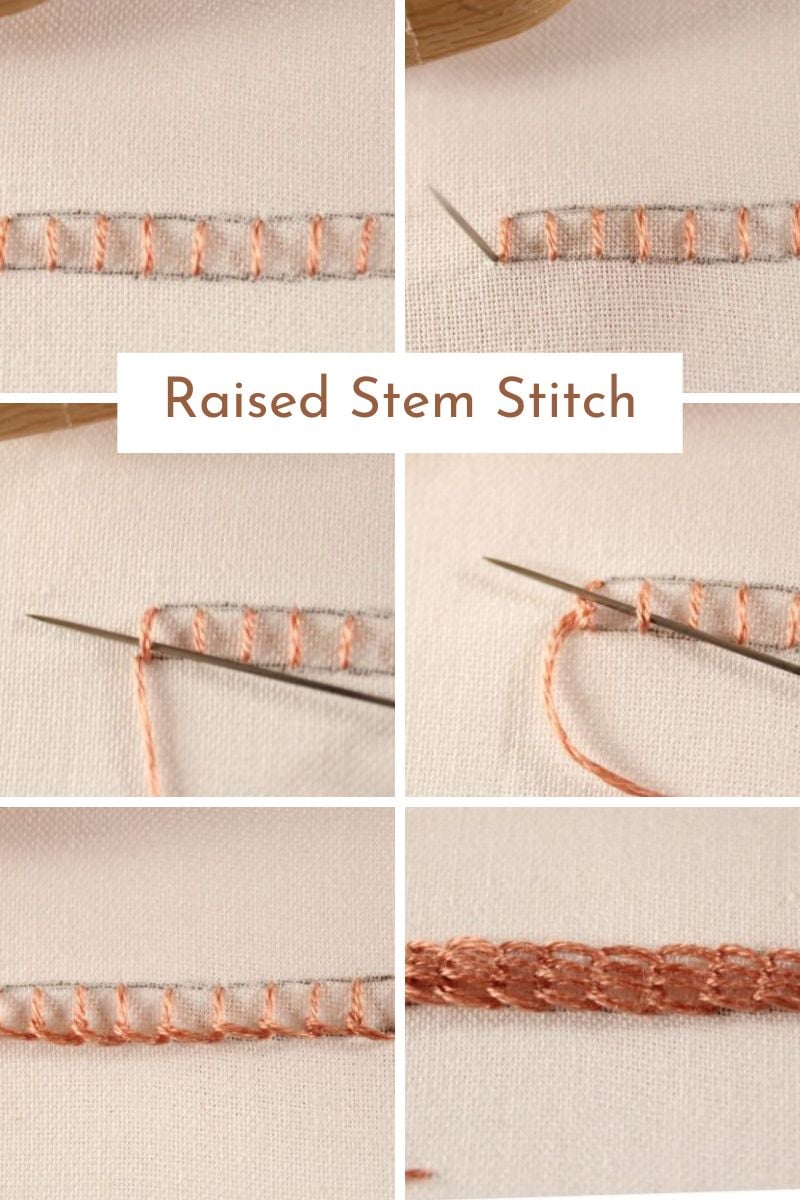
- Using an embroidery needle, make evenly spaced out straight stitches across the area you want to fill in.
- Come up directly to the side of the straight stitches.
- Switch to a tapestry needle. Bring your needle underneath the first straight stitch. Keep your working thread underneath the needle and pull through. This will form a loop.
- Repeat for each of the straight stitches.
- To fill in the entire shape, continue making rows of these stitches.
Helpful Tips
- The example uses stranded cotton embroidery floss, but sometimes it can be tricky to get the strands to lay neatly. You could also use pearl cotton thread, which is non-divisible and may be easier to work with while you’re learning how to work this stitch.
- If you have trouble snagging the thread as you’re weaving in and out of the stitches, using a blunt tapestry needle may make things easier.
- Be sure to space the vertical stitches out evenly so the stitch will look neater.
- Keep your working thread under the needle the entire time so the stem stitches lay neatly in the same direction.
- Try not to pull the stitches too tightly. You want them to be snug and even, but not super tight.

How To Use This Stitch
Basket Of Flowers

Unlike a regular stem stitch which is often used as an outline stitch, the raised stem stitch is a great one to fill in shapes and areas you want to look more textured or woven. This stitch looks great for things like baskets.

You can even fill in areas that are irregular shapes, such as the basket above that tapers towards the bottom.
Simply make shorter stitches at the widest points and then continue making long vertical stitches evenly space out to fill in the rest of the shape.
When you get down to the area that doesn’t have a vertical stitch on the marked outline, make sure to start your horizontal stitch through the outline and not directly beside the vertical stitch.
Work your way down the shape until you’ve filled in completely in.

Then, add some little flowers using single satin stitches for the petals, straight or back stitches for the stems, and French knots for the center of each flower.
A similar stitch that creates the opposite texture to that of the raised stem stitch is the whipped wheel (aka ribbed spider web stitch).
<< Back To All Embroidery Stitches


