Embroidered Pocket Tutorial (With Designs!)
Embroidery is the perfect thing to make your favorite jeans or shorts even more beautiful. This tutorial will show you how you can make an embroidered pocket on any pair of denim. You can follow along and stitch the butterfly design I stitched on a pair of denim shorts, or I’ve also provided several more designs that would be great to embroider.

Embroidered Pocket Tutorial
Supplies Needed
Disclaimer: This post contains affiliate links, which means I may earn a small commission if you choose to purchase an item.
- Your favorite pair of denim shorts or pants
- Embroidery floss – I recommend using a brand that is colorfast (purchase on Amazon)
- Embroidery Hoop – flexi hoops work best for clothes (purchase on Amazon)
- Embroidery Needle
- Stick n stitch (on Amazon) or a fabric marker to transfer the design (on Amazon)
- Seam Ripper
- Embroidery Scissors
- Sewing machine with heavy denim sewing needle
- All purpose or top stitching thread that matches the stitching on the jean pocket
Helpful Resources
Here are a few helpful resources before we get started. If you’ve never embroidered on clothes before or you aren’t quite sure what design you want to use, check out the posts below.
- Read through these helpful tips for embroidering on clothes in this post.
- If you’d like to embroider the butterfly design I used in this tutorial, check out the step by step instructions here.
- Denim can be challenging to sew on. If you plan to remove the pocket, check out some of these tips that should help you out when you’re sewing it back on.
Jean Pocket Embroidery Designs
These jean pocket embroidery designs fit perfectly on the back pocket of your jeans. Some of the designs can be stitched directly on or above the pocket. I’ve done some searching to find an assortment of embroidery designs that would be super fun to stitch.

There are also many mini embroidery design tutorials here on the blog. Here are a few that would look super cute on the pocket.


Recommended products
-
Leaping Rabbit Shirt Pocket Embroidery Pattern
Original price was: $5.00.$4.50Current price is: $4.50. -

Nature Stick and Stitch Designs
$14.00 -
Butterfly and Flowers Stick and Stitch Designs
$14.00 -
Garden Stick and Stitch Designs
$14.00


Preparing the Pocket

Once you’ve decided on a design, it’s easiest to remove the pocket. This isn’t required, but it’s really challenging to embroider on the pocket while it’s attached to the jeans and in an embroidery hoop. In the past, I have sewn entirely through the pocket so it’s unusable. I tend to use my back pockets frequently so sewing it shut isn’t the best option for me.
On a side note: If you find that only part of the design is on the top portion of the pocket, you may be able to get away with skipping this step. It’s up to you what you would like to do!
In order to remove the pocket, you’ll need to use a seam ripper to remove the stitching. (Definitely use a seam ripper for this part; it can be challenging to get under the stitches and you could easily rip a hole in the jeans or poke yourself with scissors!)
I find it easiest to start removing stitches on the inside of the jeans as these stitches are easier to get under.
Once you’ve removed some stitches, you may be able to gently pull the pocket and start unraveling the stitches. Just keep working at it and you’ll get it to come off.
Remove any loose threads from the jeans and pocket and you’re good to go.
Embroidering The Pocket
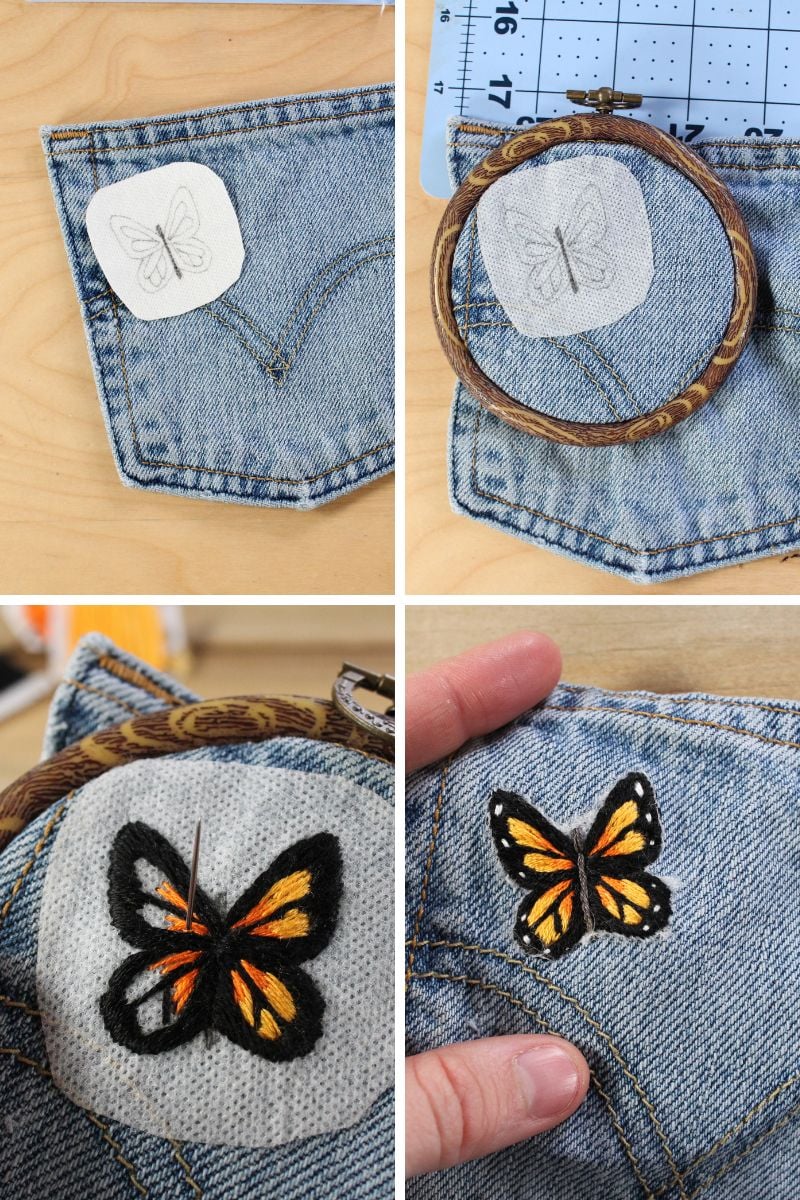
Next, you’ll want to transfer or print out your design. I really like using the stick n stitch stabilizer because you can print out or easily trace the design. (This can be really hard to do directly onto jeans with a fabric marker because the fabric is too thick.)
Once you’re happy with placement you can place it in the embroidery hoop. I prefer using the flexi embroidery hoops because I find they grip the fabric really well and they are easier to place on the fabric around the thick seam lines of the denim.
It can be tempting to not use an embroidery hoop when you’re stitching on clothes, but I think it’s beneficial because it keeps the fabric stretched. This will make it easier for you to embroider and also prevent the fabric from puckering from the tension of your stitches.
Now you’re ready to start stitching!
Depending on the type of material you’re stitching on, the edges of the stick n stitch may peel up slightly. If this happens to you, you can make a basting or running stitch to hold it in place until you’re done embroidering.
After you’re done embroidering, you can remove the stick n stitch by soaking the pocket in lukewarm water and gently rubbing around the design to remove the stabilizer.
Let the pocket air dry and then you can begin reattaching it to the jeans.
Reattaching the Embroidered Pocket

Pin the pocket back in place and thread your machine with the thread that matches the stitching of your jeans.
Denim can be hard to stitch through, so ensure you are using the appropriate needle on the machine.
Try your best to match the stitch length and type that is used on the denim. Most standard sewing machines should have the appropriate options and settings to do this.
Be sure to add some reinforcement stitches at the top of the pockets, and you’re done!


